
Chevron Friendship Bracelet Tutorial + Kollabora Craft Party!
9:00 AMEarlier this week, I announced that I'll be co-hosting a Kollabora craft party in cahoots with Megan, Linda and Valerie during the Texas Style Council mixers. The bracelet-making bonanza is this Sunday at Stella Says Go. Are you planning on going? You better be if you live in the Austin area!
To start, cut a piece of string 72 inches long in each color you plan to use. Fold the cut pieces in half, and tie a slip knot at the fold. You should now have a looped tied end, which you can fasten to your jeans (or rug, in my case!) to keep the bracelet steady while you make your knots.
Arrange the threads in the pattern that you like. For a chevron bracelet, you have two options. Option #1 is mirroring the colors on each side. For example: the left side is white, yellow, orange, blue and the right side is blue, orange, yellow, white. Option #2 is creating a mixed chevron, where the colors don't match up perfectly. For example: the left side is white, yellow, orange, blue and the right side is white yellow, blue, orange. Both look great, but for this tutorial, I am keeping it simple with a mirrored pattern.
Knotting Basics & Making The Chevron Pattern
*Note: I started knotting several rows of this bracelet so you would
be able to see the pattern better, since the beginning section was
tricky to photograph.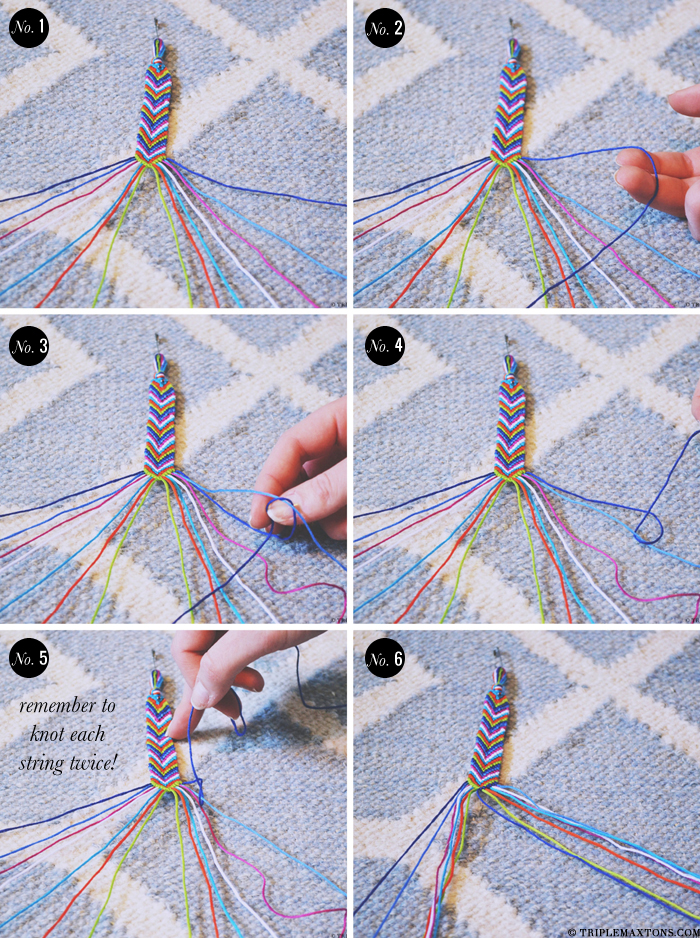
1. Spread your strings out so you can clearly tell where the colors start repeating.
2. Starting at the far right side, you are going to start making right knots. Take the outermost string and place it over the string to its left so it looks a little like a "P." .
3. Pull the end of the string through the loop.
4. This is what your knot should look like.
5. Holding the string taut, pull the knot upwards. Repeat once more.
6. Repeat on each string until you get to the middle.
Repeat steps 1 through 6 on the left side. When you get to the middle of the bracelet, the two colors of string you just knotted will be the same. Use a right knot to tie the two middle pieces together to make the chevron point. Keep knotting rows until your bracelet is long enough to wear.
Confused? Watch this...
Finishing The Bracelets
Finish your bracelet by braiding the strings from the left and right side separately. Tie a knot once you reach the end, trim the frayed edges, and pull one of the braids through the starting loop, and tie a bow.See....making a chevron friendship bracelet is so easy, even a caveman could do it! Show us your crafting skills, come say hi, join in on the fun, and make your very own bracelet with us this Sunday!
KEEP UP WITH TRIPLE MAX TONS

.JPG)


3 comments
I feel like we may have talked about this but where in Wisconsin? I went up north every summer too!!!
ReplyDeleteballs yes! i was just thinking today about how i needed to make some friendship bracelets asap. and here this is...rad.
ReplyDeleteThis bracelet is so nice for my hand.. I'll try it..
ReplyDeleteThanks for leaving a sweet little note...I love reading them triple max tons!